RAPID Pipeline Development
Increasing AWS Cloud Limits
Submit a ticket to the IPAC Support Group (ISG) requesting an AWS increase in the relevant limit for the RAPID project (this involves Wendy submitting a ticket to AWS).
Login with your IPAC credentials (not sure whether VPN must be running).
Development Guidelines
Set up your text editor to clip trailing spaces when saving source-code file (e.g., BBEdit has a setting that does this).
Ensure no tab characters are used for indentation in your Python code; use spaces always (e.g., BBEdit has a setting that does this).
Think strategically when pushing a source-code file to the git repo whether a simple git diff between revisions will allow a clear and unambiguous indication of the code changes. For example, numerous stylistic changes can hide substantive changes that affect code behavior and should be deferred to a separate revision.
Before checking into the git repo modifications to someone else’s source code, let that person know what to expect (and assure there is the expected level of trust beforehand).
Your git commits should have self-explanatory descriptive messages (saves time not having to review source code later for reports).
Always test code changes before the code is put into operations; the development is not done until the code changes have been tested.
Include a sufficiency of comments in your source code!
Remember to
git pullbefore anygit pushand often, in order to make sure your RAPID git repo is up to date.For exitcodes, we follow the Spitzer convention:
Exitcode range |
Definition |
|---|---|
[0,31] |
Normal termination, with messages |
[32,61] |
Warnings |
[64+] |
Error |
GitHub Merging, Branching, and Pull Requests
This section describes the recommended git workflow for contributing to the RAPID code base.
Note
Pending approval of the team, we will be migrating to a dev branch
workflow and disabling direct pushes to main. Once this is in
effect, all routine development will target dev, and changes will
reach main only through pull requests. The instructions
below assume this workflow.
GitHub Branches
The RAPID repository follows a two-branch model:
main— the stable, production branch. Direct pushes will be disabled; it is updated only via approved pull requests.dev— the active development branch. Day-to-day work lands here.
The general rule of thumb: small changes can go straight to dev, while
large changes or new features get their own branch off dev and can be
merged back via a pull request. The diagram below illustrates the full flow:
a feature branch off dev, two commits of work, a pull request merging the
feature back into dev, and dev later merging into main.
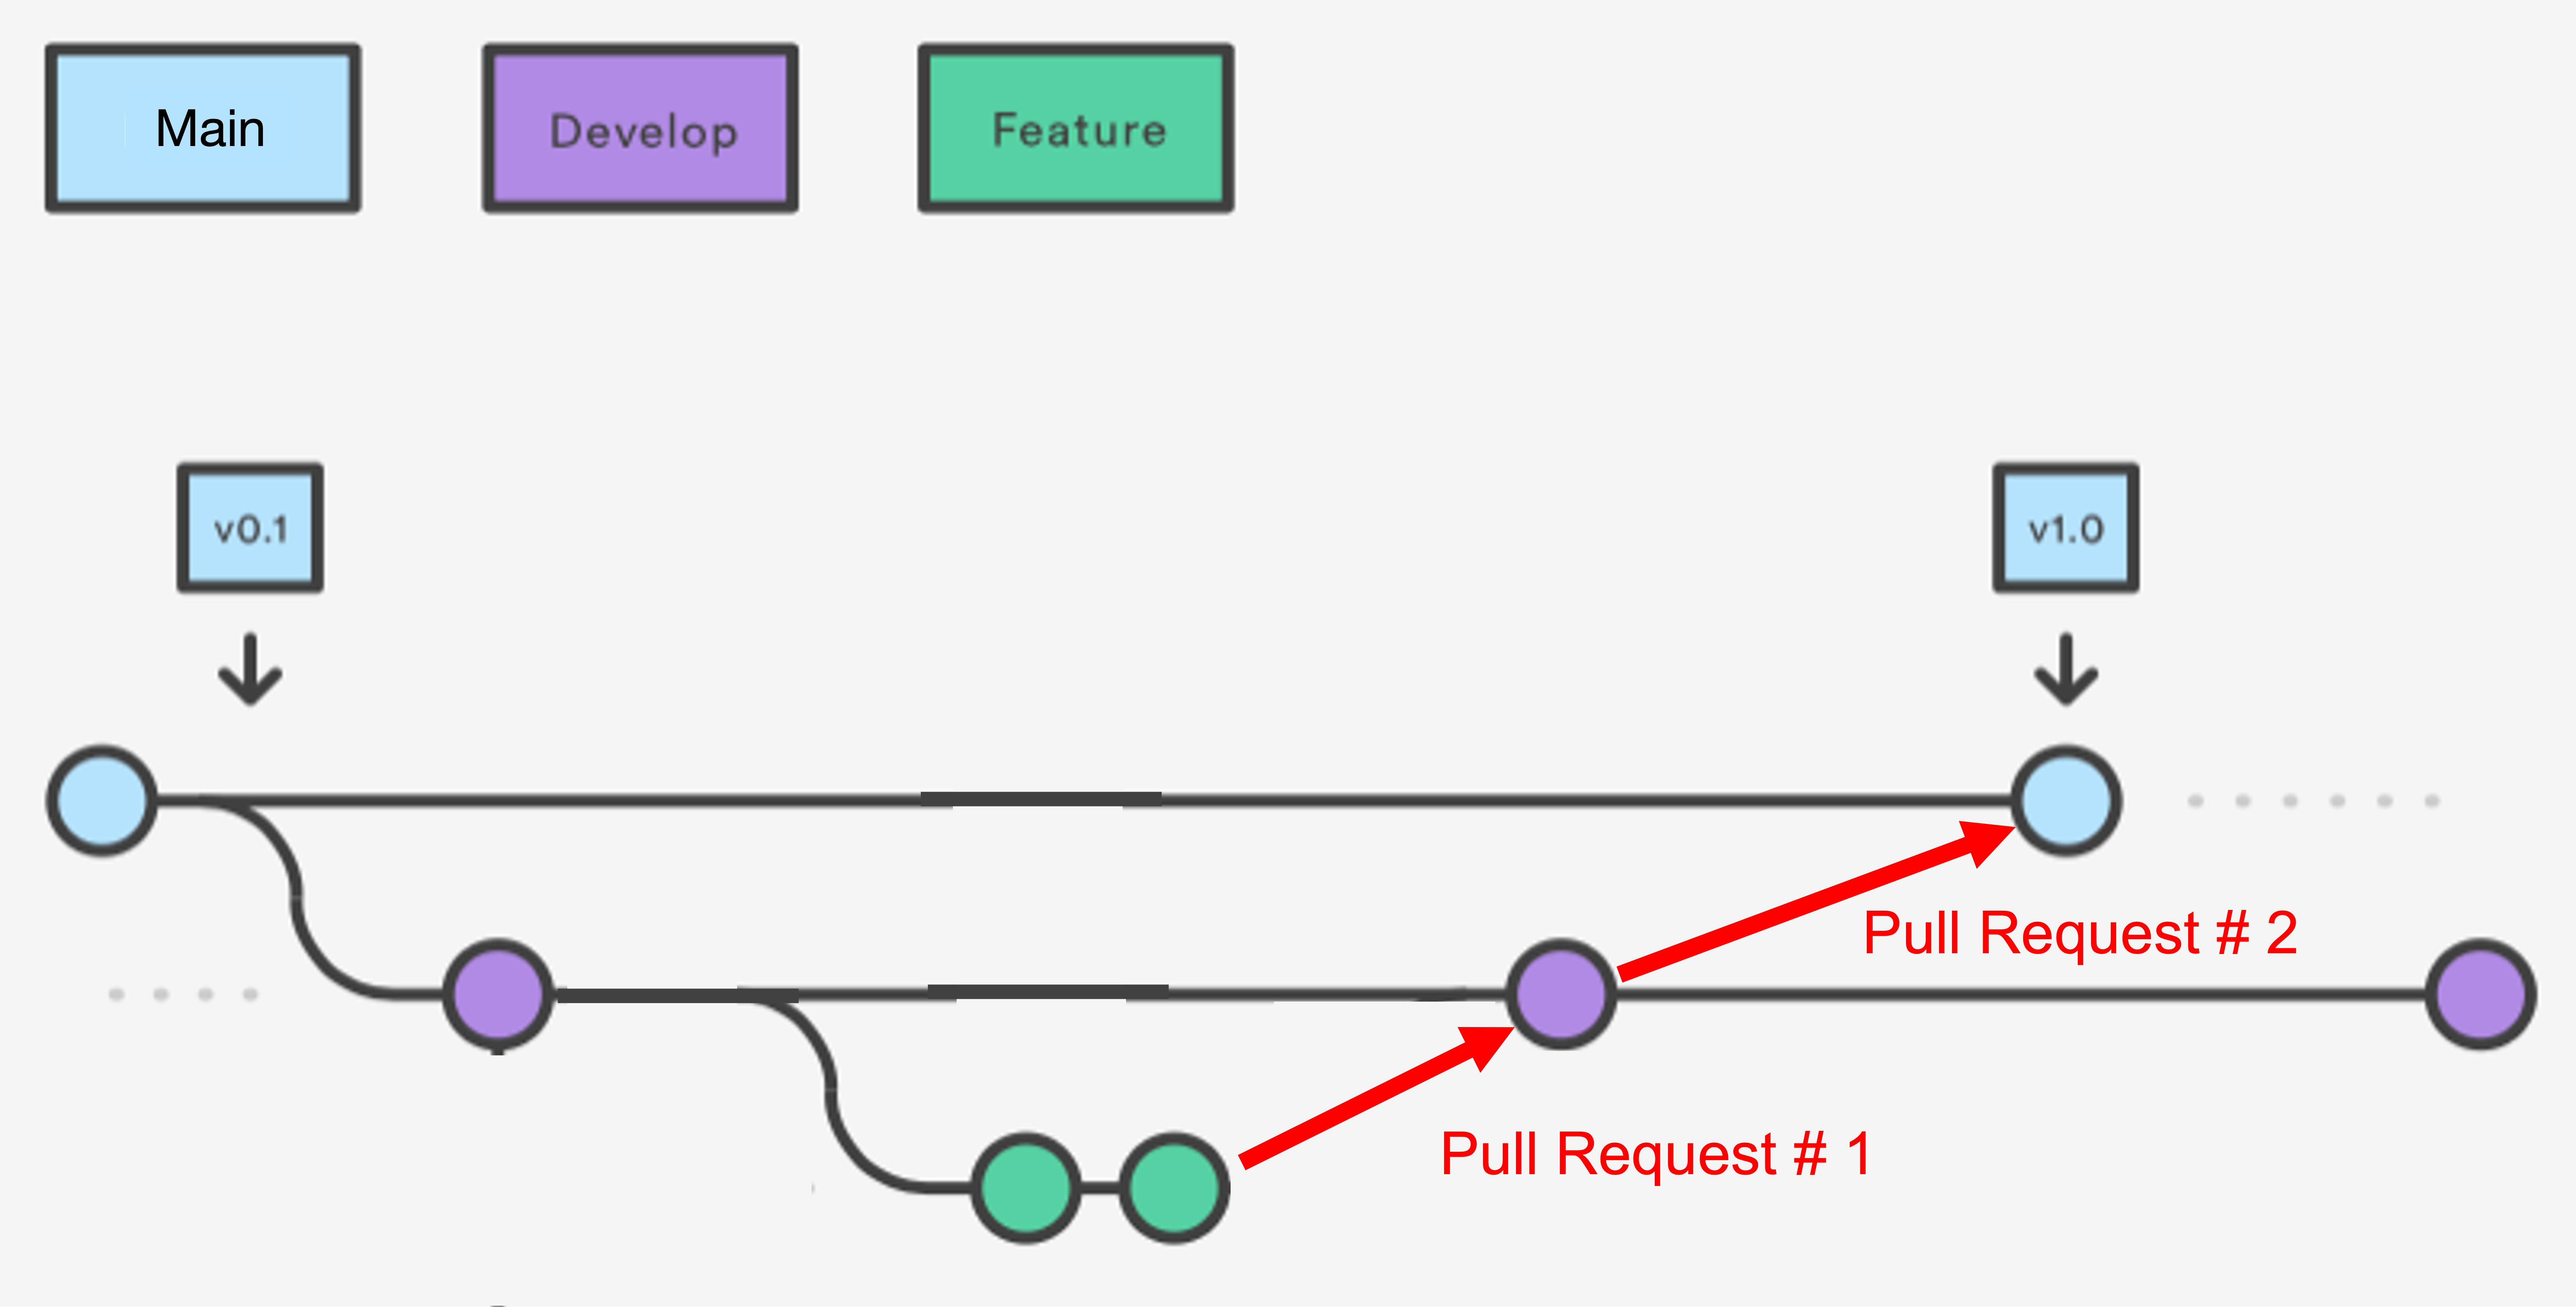
Source: Code/Astro Workshop
Small Changes
Small, low-risk changes (a bug fix, a comment, a one-line tweak) can be
pushed directly to dev. The basic cycle is pull, commit, push:
git pull
git add <files>
git commit -m "Describe your change"
git push
If you have unsaved changes and git pull reports a
conflict, stash your changes, pull, then re-apply your stash:
git stash
git pull
git stash pop
After git stash pop, resolve any conflicts that git reports
(see merge conflicts, below), then commit and push as above.
If you have a local commit that conflicts with a pulled commit, causing
git pull to fail:
git pull --rebase
This will move HEAD to the latest commit from the remote branch and replay your changes on top. Resolve the merge conflict (see below), and run:
git add <files you want>
git rebase --continue
Large Changes / Feature Additions
For larger changes or new features, create a dedicated branch off dev
so that work-in-progress does not destabilize the shared branch.
Create a branch from dev
If you are already on dev, create and switch to a new branch:
git checkout -b my_branch
# or
git checkout -b my_branch dev # if you are on another branch
Then push the branch to GitHub and set it to track the remote, so that
future git push / git pull commands work without extra arguments:
git push -u origin my_branch
After this, make commits as normal to your new branch.
Open a Pull Request back to dev
When you are done with your feature branch or have completed major changes,
open a pull request on GitHub to merge it into dev:
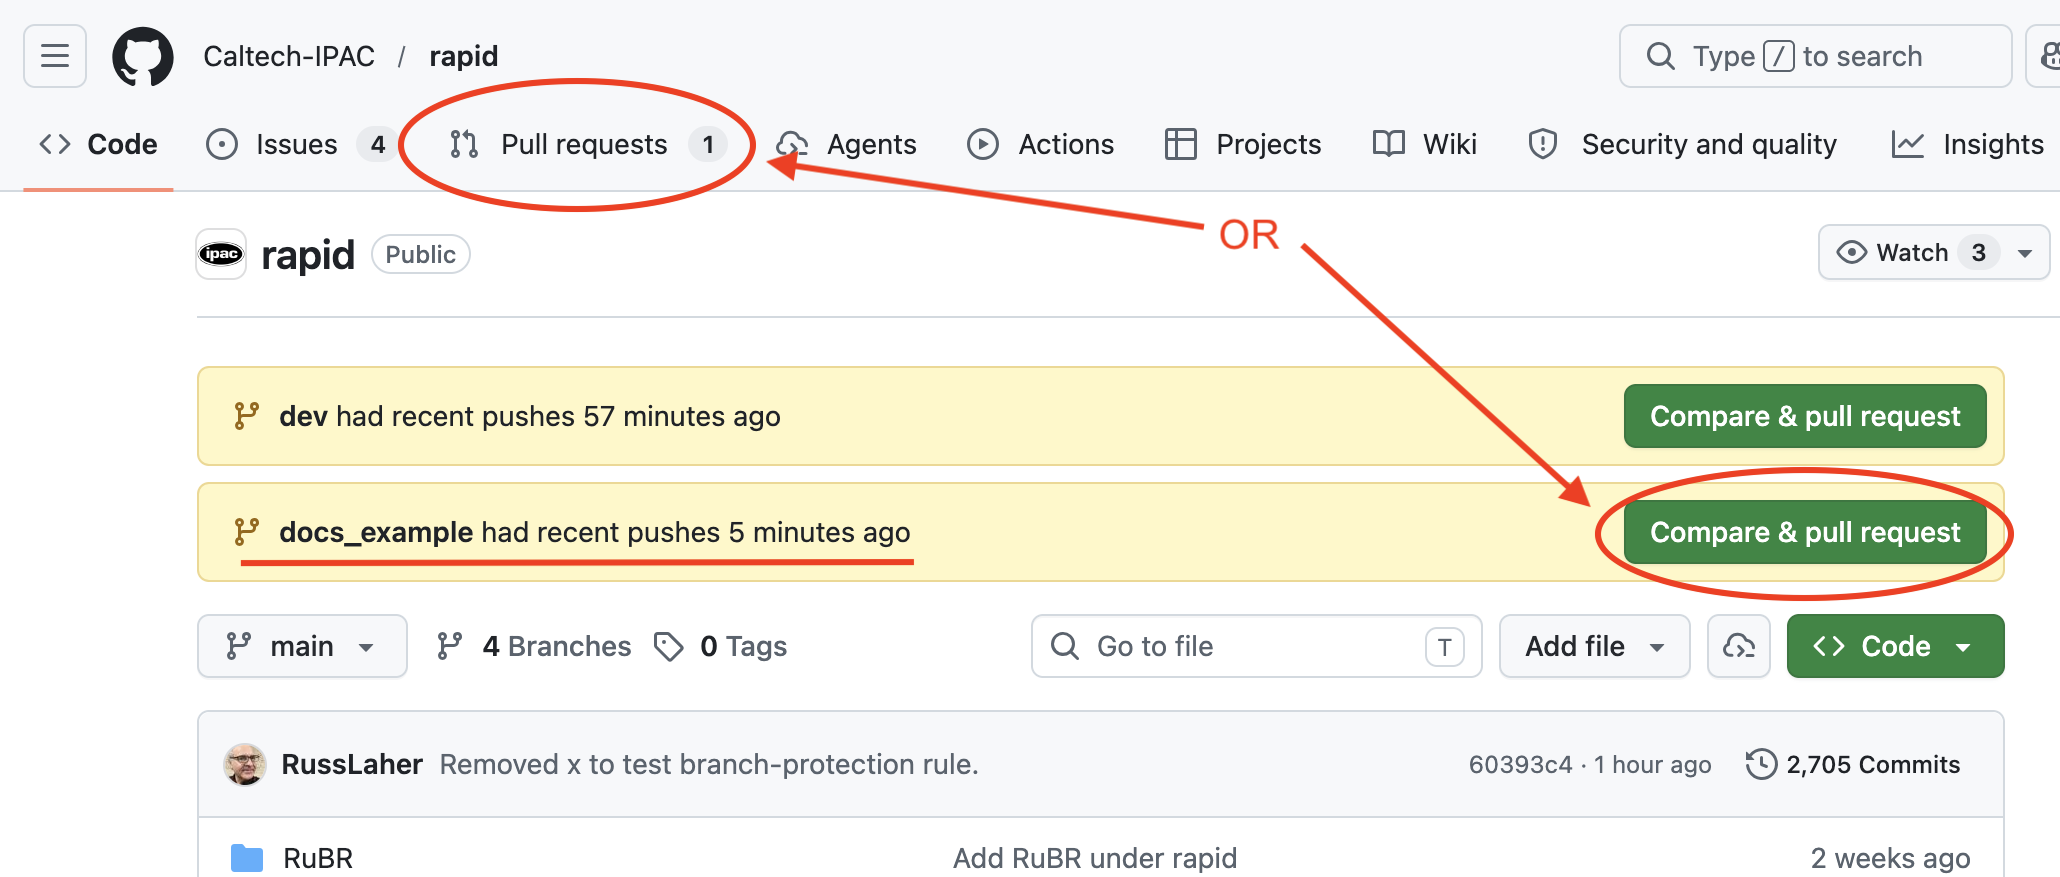
Push your latest commits (
git push).On GitHub, navigate to the repository. A banner usually appears offering to Compare & pull request for your recently pushed branch — click it. Otherwise, go to the Pull requests tab and click New pull request.
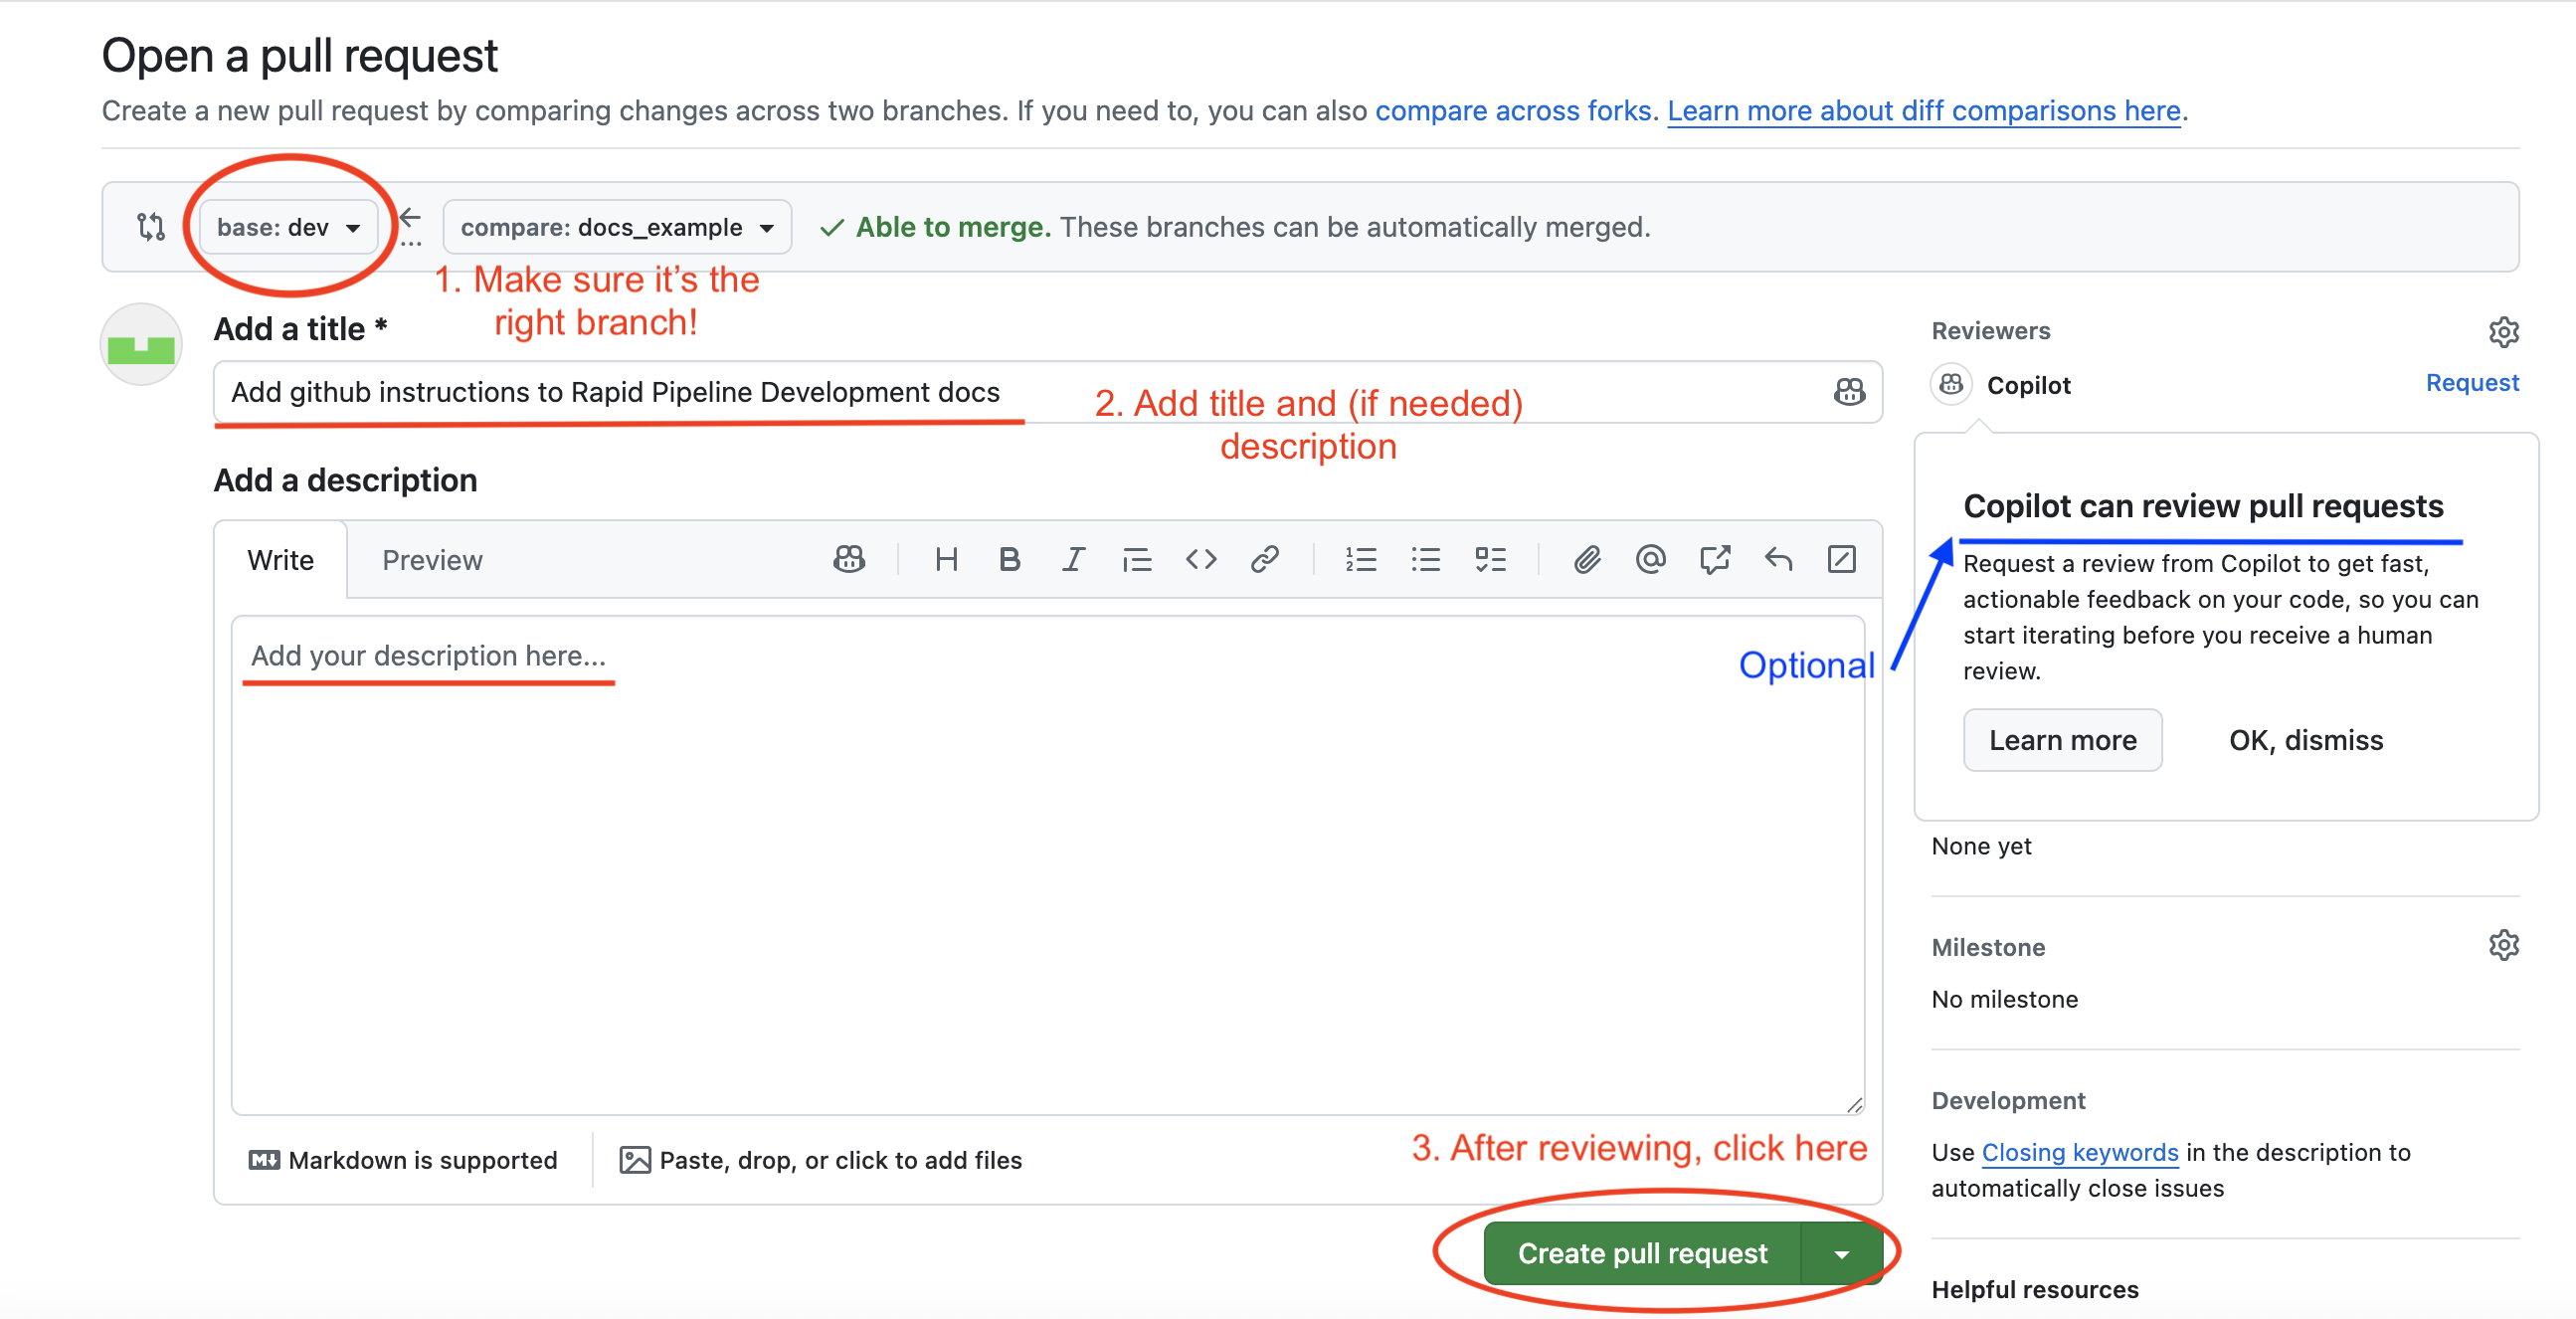
Set the base branch to
devand the compare branch tomy_branch. Double-check that the base isdevand notmain.Give the PR a descriptive title and summary, then click Create pull request.
Request a reviewer if required, and address any review comments by pushing additional commits to
my_branch(the PR updates automatically).Once approved, click Merge pull request to merge into
dev.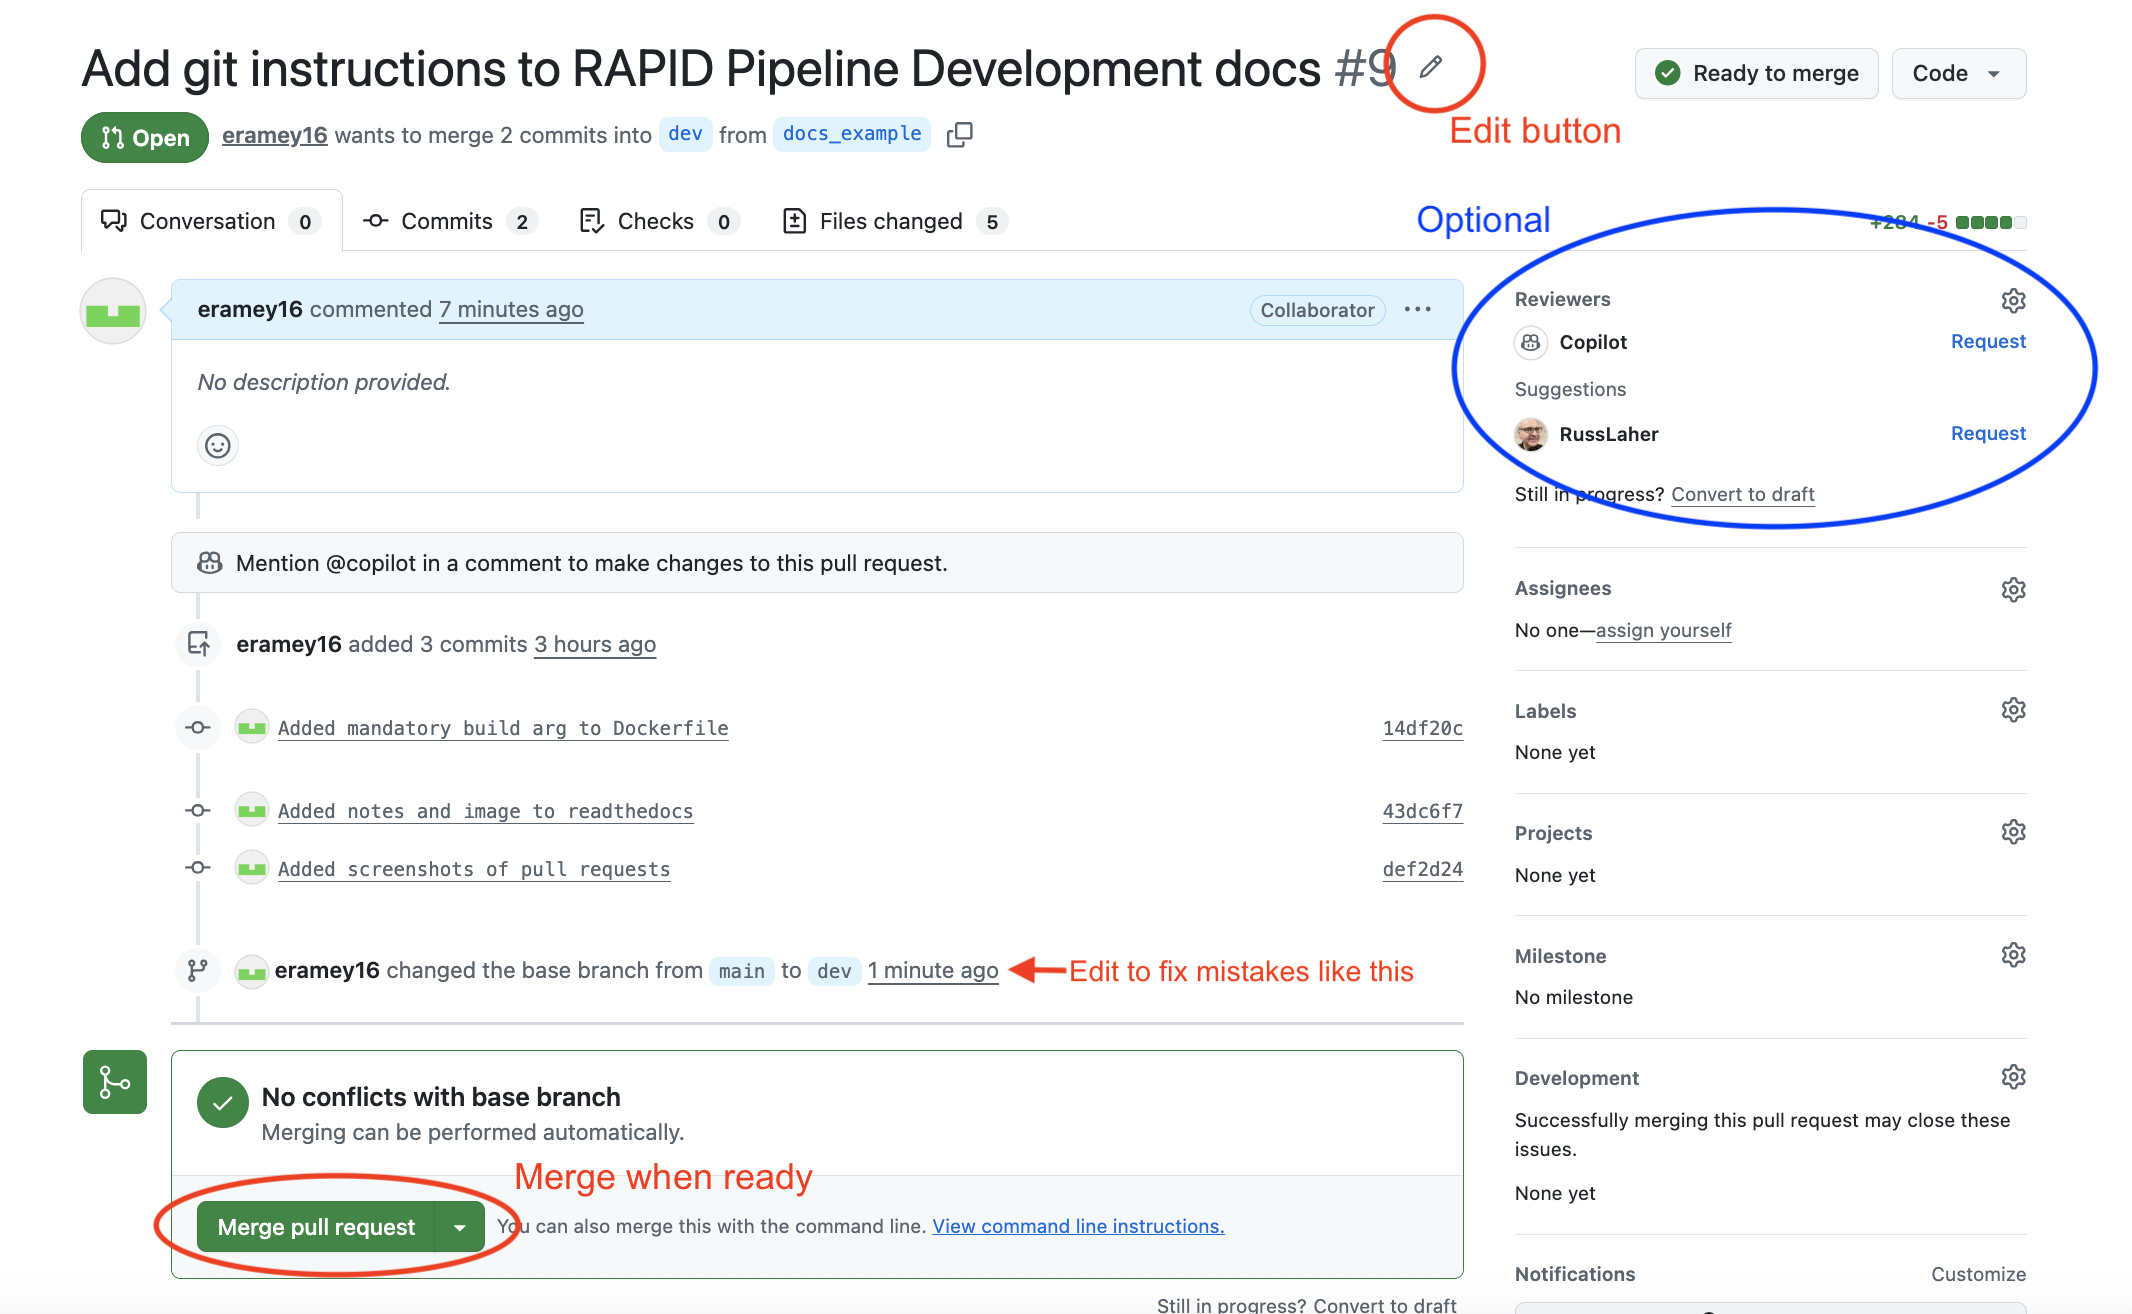
Close the branch after merging (optional)
Once the pull request is merged, if you are finished editing a particular feature, delete the branch to keep the repository tidy. On GitHub, click the Delete branch button shown on the merged pull request. To delete the branch locally and on the remote from the command line:
git checkout dev
git pull
git branch -d my_branch
git push origin --delete my_branch
The git pull on dev brings in your just-merged changes. Use
git branch -d (lowercase) to delete only a branch that has been fully
merged; git branch -D (uppercase) forces deletion of an unmerged
branch, so use it with care.
Merging changes from dev
If dev has moved ahead and you need those changes in your branch,
fetch the latest refs and merge dev into your branch:
git fetch origin
git merge origin/dev
Resolve any conflicts git reports, then commit the merge and push:
git add <files>
git commit
git push
Resolving Merge Conflicts
A conflict happens when two changes touch the same lines of a file and git cannot decide which to keep. This can come up after any of the operations above. Git will report which files conflicted, for example:
Auto-merging pipeline.py
CONFLICT (content): Merge conflict in pipeline.py
Automatic merge failed; fix conflicts and then commit the result.
You can always list the files that still need attention:
git status
Conflicted files are shown under “Unmerged paths”.
Editing the conflict markers
Open each conflicted file. Git inserts markers around the disagreeing sections:
<<<<<<< HEAD
your version of the lines
=======
the incoming version of the lines
>>>>>>> origin/dev
The block above ======= is your current branch’s version (HEAD);
the block below is the incoming version (here, origin/dev). Edit the
file so it contains exactly what you want the final result to be, and
delete all three marker lines (<<<<<<<, =======, >>>>>>>).
Note
VS Code makes this easier: it highlights each conflict and offers Accept Current Change, Accept Incoming Change, Accept Both Changes, or Compare Changes buttons directly above the conflict. Click the one you want, or edit manually, then save the file.
Completing the merge
Once a file looks correct, stage it to mark the conflict resolved, then repeat for every conflicted file:
git add <file>
When git status shows no remaining unmerged paths, finish the
operation:
After a merge or stash pop, commit the result:
git commitAfter a pull that started a rebase, continue it instead:
git rebase --continue
Then push as usual.
Bailing out
If things get tangled and you want to start over, you can abort and return to the state before the operation began:
git merge --abort      # during a conflicted merge
git rebase --abort     # during a conflicted rebase
If you applied a stash with git stash pop and want to undo it, note that
pop removes the stash once applied; use git stash apply instead when
you want to keep the stash entry around as a safety net while resolving.
Log into EC2 Instance Machine
This assumes you have already set up an EC2 instance under the AWS console, and that the EC2 instance is stopped.
Also, a key pair has been assigned to the EC2 instance, and the private key is installed in a .pem file on your laptop.
Ensure the following environment variables are set on your laptop:
AWS_DEFAULT_REGION
AWS_SECRET_ACCESS_KEY
AWS_EC2_INSTANCE_ID
AWS_ACCESS_KEY_ID
AWS_EC2_VOLUME_ID
AWS_EC2_VOLUME_DEVICE
The two latter ones are only needed if your EC2 instance is to have an EBS volume attached.
Your EC2 instance should have a large enough book-disk volume as docker build requires a lot of space; at least 32 GB is recommended.
Ensure python3 is installed on your laptop and restart your EC2 instance:
python /source-code/location/rapid/aws/start_ec2_instance.py
Here is how to stop your EC2 instance later:
python /source-code/location/rapid/aws/stop_ec2_instance.py
Log into your EC2 instance:
ssh -i ~/.ssh/my_ec2.pem ubuntu@ec2-54-212-213-65.us-west-2.compute.amazonaws.com
Build Docker Image for RAPID Science Pipeline
Check your latest source-code changes into the RAPID git repo.
Under root on your EC2 instance, check out the latest source code from the RAPID git repo, and then build the Docker image for the RAPID pipeline:
sudo su
cd /home/ubuntu/rapid
git pull
The following command removes ALL Docker images from your EC2 instance, but has the advantage of removing all Docker debris from the boot-disk volume, thus reclaiming disk space:
docker system prune -a -f
Warning
The above docker system prune command and the docker build command below will not work properly or as intended,
meaning the expected disk space will not be reclaimed,
unless all containers running the Docker image rapid_science_pipeline:1.0 are stopped!
Here is how to get a listing of your Docker containers that are running:
docker ps
Here is how to get a listing of your Docker images:
docker image ls
Rebuild the Docker image from scratch:
cd /home/ubuntu/rapid
docker build --build-arg RAPID_BRANCH=<current branch> --file /home/ubuntu/rapid/docker/Dockerfile_ubuntu_runSingleSciencePipeline --tag rapid_science_pipeline:1.0 .
Push Docker image to the Amazon public elastic container registry (ECR):
Note that the RAPID-pipeline image has already been registered at
public.ecr.aws/y9b1s7h8/rapid_science_pipeline
and so this step involves simply updating the Docker image in the registry.
Authenticate your Docker client to the registry as follows:
aws ecr-public get-login-password --region us-east-1 | docker login --username AWS --password-stdin public.ecr.aws/y9b1s7h8
Now get the Docker image ID as follows:
docker image ls
The response will be something like:
REPOSITORY               TAG       IMAGE ID       CREATED         SIZE
rapid_science_pipeline   1.0       a76b1373bfe2   6 minutes ago   2.36GB
Tag the Docker image with “latest” and push to ECR with these two commands:
docker tag a76b1373bfe2 public.ecr.aws/y9b1s7h8/rapid_science_pipeline:latest
docker push public.ecr.aws/y9b1s7h8/rapid_science_pipeline:latest
Running an Instance of the RAPID Science Pipeline under AWS Batch
The following shows commands to launch an instance of the RAPID science pipeline as AWS Batch job.
The to-be-run-under-AWS-Batch Docker container rapid_science_pipeline:1.0 has /code built in,
so there is no need to mount an external volume for /code.
The container name is arbitrary, and is set to “russ-test-jobsubmit” in the example below.
Since this Docker image contains the ENTRYPOINT instruction, you must override it with the --entrypoint bash option
(and do not put bash at the end of the command).
mkdir -p /home/ubuntu/work/test_20250314
cd /home/ubuntu/work/test_20250314
aws s3 cp s3://rapid-pipeline-files/roman_tessellation_nside512.db /home/ubuntu/work/test_20250314/roman_tessellation_nside512.db

sudo su

docker stop russ-test-jobsubmit
docker rm russ-test-jobsubmit

docker run -it --entrypoint bash --name russ-test-jobsubmit -v /home/ubuntu/work/test_20250314:/work public.ecr.aws/y9b1s7h8/rapid_science_pipeline:latest

export DBPORT=5432
export DBNAME=rapidopsdb
export DBUSER=rapidporuss
export DBSERVER=35.165.53.98
export DBPASS="????"
export AWS_DEFAULT_REGION=us-west-2
export AWS_SECRET_ACCESS_KEY=????
export AWS_ACCESS_KEY_ID=????
export LD_LIBRARY_PATH=/code/c/lib
export PATH=/code/c/bin:$PATH
export export RAPID_SW=/code
export export RAPID_WORK=/work
export PYTHONPATH=/code
export PYTHONUNBUFFERED=1

git config --global --add safe.directory /code

cd /tmp
export ROMANTESSELLATIONDBNAME=/work/roman_tessellation_nside512.db
export RID=172211
python3.11 /code/pipeline/awsBatchSubmitJobs_launchSingleSciencePipeline.py

exit
Python 3.11 is required and it is installed inside the Docker image (/usr/bin/python3.11).
After the AWS Batch job finishes, there are files written to S3 buckets that can be examined:
aws s3 ls --recursive s3://rapid-pipeline-files/20250314/ | grep jid1\\.

2025-03-14 11:22:33       3784 20250314/input_images_for_refimage_jid1.csv
2025-03-14 11:22:33      14307 20250314/job_config_jid1.ini
aws s3 ls --recursive s3://rapid-pipeline-logs/20250314/ | grep jid1_

2025-03-14 11:28:38     207277 20250314/rapid_pipeline_job_20250314_jid1_log.txt
aws s3 ls --recursive s3://rapid-product-files/20250314/jid1/

2025-03-14 11:24:03   21813719 20250314/jid1/Roman_TDS_simple_model_F184_1856_2_lite.fits.gz
2025-03-14 11:26:59   66888000 20250314/jid1/Roman_TDS_simple_model_F184_1856_2_lite_reformatted.fits
2025-03-14 11:27:01   66888000 20250314/jid1/Roman_TDS_simple_model_F184_1856_2_lite_reformatted_pv.fits
2025-03-14 11:27:00   66888000 20250314/jid1/Roman_TDS_simple_model_F184_1856_2_lite_reformatted_unc.fits
2025-03-14 11:26:14  196004160 20250314/jid1/awaicgen_output_mosaic_cov_map.fits
2025-03-14 11:27:03   66890880 20250314/jid1/awaicgen_output_mosaic_cov_map_resampled.fits
2025-03-14 11:26:36  196007040 20250314/jid1/awaicgen_output_mosaic_image.fits
2025-03-14 11:27:02   66890880 20250314/jid1/awaicgen_output_mosaic_image_resampled.fits
2025-03-14 11:28:34  133770240 20250314/jid1/awaicgen_output_mosaic_image_resampled_gainmatched.fits
2025-03-14 11:27:17    1248727 20250314/jid1/awaicgen_output_mosaic_image_resampled_refgainmatchsexcat.txt
2025-03-14 11:26:30    3465552 20250314/jid1/awaicgen_output_mosaic_refimsexcat.txt
2025-03-14 11:26:43  196007040 20250314/jid1/awaicgen_output_mosaic_uncert_image.fits
2025-03-14 11:27:04   66890880 20250314/jid1/awaicgen_output_mosaic_uncert_image_resampled.fits
2025-03-14 11:28:33   66890880 20250314/jid1/bkg_subbed_science_image.fits
2025-03-14 11:27:17     436195 20250314/jid1/bkg_subbed_science_image_scigainmatchsexcat.txt
2025-03-14 11:28:30   66890880 20250314/jid1/diffimage_masked.fits
2025-03-14 11:28:32     148657 20250314/jid1/diffimage_masked.txt
2025-03-14 11:28:36     216901 20250314/jid1/diffimage_masked_psfcat.txt
2025-03-14 11:28:36   66885120 20250314/jid1/diffimage_masked_psfcat_residual.fits
2025-03-14 11:28:31   66888000 20250314/jid1/diffimage_uncert_masked.fits
2025-03-14 11:28:32      28800 20250314/jid1/diffpsf.fits
2025-03-14 09:19:39   66853440 20250314/jid1/refiminputs/Roman_TDS_simple_model_F184_1087_7_lite_reformatted.fits
2025-03-14 09:19:51   66853440 20250314/jid1/refiminputs/Roman_TDS_simple_model_F184_1087_7_lite_reformatted_unc.fits
2025-03-14 09:19:43   66853440 20250314/jid1/refiminputs/Roman_TDS_simple_model_F184_1087_8_lite_reformatted.fits
2025-03-14 09:19:56   66853440 20250314/jid1/refiminputs/Roman_TDS_simple_model_F184_1087_8_lite_reformatted_unc.fits
2025-03-14 09:19:42   66853440 20250314/jid1/refiminputs/Roman_TDS_simple_model_F184_1476_11_lite_reformatted.fits
2025-03-14 09:19:55   66853440 20250314/jid1/refiminputs/Roman_TDS_simple_model_F184_1476_11_lite_reformatted_unc.fits
2025-03-14 09:19:34   66853440 20250314/jid1/refiminputs/Roman_TDS_simple_model_F184_1476_14_lite_reformatted.fits
2025-03-14 09:19:46   66853440 20250314/jid1/refiminputs/Roman_TDS_simple_model_F184_1476_14_lite_reformatted_unc.fits
2025-03-14 09:19:41   66853440 20250314/jid1/refiminputs/Roman_TDS_simple_model_F184_1481_16_lite_reformatted.fits
2025-03-14 09:19:54   66853440 20250314/jid1/refiminputs/Roman_TDS_simple_model_F184_1481_16_lite_reformatted_unc.fits
2025-03-14 09:19:35   66853440 20250314/jid1/refiminputs/Roman_TDS_simple_model_F184_317_9_lite_reformatted.fits
2025-03-14 09:19:47   66853440 20250314/jid1/refiminputs/Roman_TDS_simple_model_F184_317_9_lite_reformatted_unc.fits
2025-03-14 09:19:38   66853440 20250314/jid1/refiminputs/Roman_TDS_simple_model_F184_322_2_lite_reformatted.fits
2025-03-14 09:19:50   66853440 20250314/jid1/refiminputs/Roman_TDS_simple_model_F184_322_2_lite_reformatted_unc.fits
2025-03-14 09:19:37   66853440 20250314/jid1/refiminputs/Roman_TDS_simple_model_F184_322_3_lite_reformatted.fits
2025-03-14 09:19:49   66853440 20250314/jid1/refiminputs/Roman_TDS_simple_model_F184_322_3_lite_reformatted_unc.fits
2025-03-14 09:19:40   66853440 20250314/jid1/refiminputs/Roman_TDS_simple_model_F184_327_14_lite_reformatted.fits
2025-03-14 09:19:53   66853440 20250314/jid1/refiminputs/Roman_TDS_simple_model_F184_327_14_lite_reformatted_unc.fits
2025-03-14 09:19:36   66853440 20250314/jid1/refiminputs/Roman_TDS_simple_model_F184_327_15_lite_reformatted.fits
2025-03-14 09:19:48   66853440 20250314/jid1/refiminputs/Roman_TDS_simple_model_F184_327_15_lite_reformatted_unc.fits
2025-03-14 09:19:31   66853440 20250314/jid1/refiminputs/Roman_TDS_simple_model_F184_702_8_lite_reformatted.fits
2025-03-14 09:19:44   66853440 20250314/jid1/refiminputs/Roman_TDS_simple_model_F184_702_8_lite_reformatted_unc.fits
2025-03-14 09:19:32   66853440 20250314/jid1/refiminputs/Roman_TDS_simple_model_F184_707_1_lite_reformatted.fits
2025-03-14 09:19:45   66853440 20250314/jid1/refiminputs/Roman_TDS_simple_model_F184_707_1_lite_reformatted_unc.fits
2025-03-14 09:19:57        682 20250314/jid1/refiminputs/refimage_sci_inputs.txt
2025-03-14 09:19:57        730 20250314/jid1/refiminputs/refimage_unc_inputs.txt
2025-03-14 11:28:32   66890880 20250314/jid1/scorrimage_masked.fits
The general scheme for how the output files are organized in the S3 buckets is according to processing date (Pacific Time) and the associated job ID. The same job ID can exist under different processing dates if reprocessing occurred on different dates (reprocessing on the same date will overwrite products).
The files under refiminputs are only written if the upload_inputs flag in the software is set to True. These are for
off-line analysis and rerunning awaicgen for experimental and tuning purposes.
The reference-image products from awaicgen
are initially given generic filenames in these buckets, and, later, will be renamed to filenames like:
rapid_field1234567_fid7_ppid15_v2_rfid12394758_refimage.fits
rapid_field1234567_fid7_ppid15_v2_rfid12394758_covmap.fits
The above filenames are created after these products are registered in the RAPID pipeline operations database.
The products are then copied to
a more permanent location (and ultimately archived in MAST). The ppid gives the pipeline number
that generated the reference image, which could be either the difference-image pipeline (ppid=15)
or a dedicated reference-image pipeline (ppid=12).
Download and examine log file:
aws s3 cp s3://rapid-pipeline-logs/20250314/rapid_pipeline_job_20250314_jid1_log.txt rapid_pipeline_job_20250314_jid1_log.txt
cat rapid_pipeline_job_20250314_jid1_log.txt
Last modified: Tue 2026 Jun 16 8:48 a.m.